summary
해시 데이터구조, 연결리스트 데이터구조를 알아본다.
해시테이블 구현을 통해 해시, 연결리스트를 사용한다.
Hash
임의 데이터를 고정 길이의 데이터로 매핑
해시 값을 만들어주는 함수를 해시함수라고 하며, 해시함수는 인풋으로 들어온 값을 고정길이의 매핑된 값을 반환한다.
매핑된 해시값은 데이터가 다르더라도 같아질 수 있는데, 이를 충돌이라 한다.
좋은 해시함수는 충돌이 최소한으로 나는 함수이다.
연결 리스트
선형데이터 구조로, 한 데이터가 다음 데이터를 가리키는 구조
head 라는 시작 값이 있고, 각 데이터(노드)는 값고 다음 값을 가리키는 pointer를 가지고 있다.
코드를 통해 구현해보자.
먼저 Node 클래스를 구현해보자.
class Node {
  constructor(key, value) {
    this.key = key;
    this.value = value;
    this.next = null;
  }
}
생성자에서 key, value를 받아 각각 값에 할당하고, next라는 pointer를 null로 초기화한다.
다음은 LinkedList 클래스를 구현해보자.
클래스는 private variable head 와 length 를 가지고 있다.
프라이빗 변수들은 여러 메소드에서 참조 및 재할당할 수 있다.
메소드는 다음과 같다.
- append(key, value)
- node를 생성한 뒤 연결리스트의 맨 끝에 노드를 배치한다.
- removeAt(position)
- insert(position, key, value)
- indexOf(key)
- key에 해당하는 node의 위치를 반환한다.
- remove(key)
- getByKey(key)
이외에 모든 리스트의 상태를 확인하는 print 메소드와 리스트와 크기 및 비어있음 여부를 확인하는 getter 를 구현한다.
class LinkedList {
  #head = null;
  #length = 0;

  append(key, value) {
    const node = new Node(key, value);

    if (!this.#head) {
      this.#head = node;
      this.#length += 1;
      return;
    }

    let current = this.#head;
    while (current.next) {
      current = current.next;
    }
    current.next = node;
    this.#length += 1;
  }

  removeAt(position) {
    const isInvalidPosition = position < 0 && position >= this.#length;
    if (isInvalidPosition) {
      return null;
    }

    if (position === 0) {
      const removedItem = this.#head;
      this.#head = this.#head.next;
      this.#length -= 1;
      return removedItem;
    }

    let current = this.#head;
    let previous = null;
    let index = 0;
    while(index < position) {
      previous = current;
      current = current.next;
      index += 1;
    }

    previous.next = current.next;
    this.#length -= 1;
    return current.key;
  }

  insert(position, key, value) {
    const isInvalidPosition = position < 0 && position >= this.#length;
    if (isInvalidPosition) {
      return false;
    }

    const node = new Node(key, value);
    let current = this.#head;
    let previous = null;
    let index = 0;
    while(index < position) {
      previous = current;
      current = current.next;
      index += 1;
    }

    previous.next = node;
    node.next = current;
    this.#length += 1;
    return true;
  }

  indexOf(key) {
    let current = this.#head;
    let index = 0;
    while(current) {
      if (current.key === key) {
        return index;
      }
      current = current.next;
      index += 1;
    }

    return -1;
  }

  remove(key) {
    const removeTargetIndex = this.indexOf(key);
    return this.removeAt(removeTargetIndex);
  }

  get size() {
    return this.#length;
  }

  get isEmpty() {
    return this.size === 0;
  }

  getHead() {
    return this.#head;
  }

  getByKey(key) {
    let current = this.#head;
    while(current) {
      if (current.key === key) {
        return current;
      }
      current = current.next;
    }
    return null;
  }

  print() {
    const elementList = [];
    let current = this.#head;
    while (current) {
      elementList.push(`{key: ${current.key}, value: ${current.value}}`);
      current = current.next;
    }

    console.log(`linked list: [${elementList.join(' -> ')}]`);
  }
}
연결 리스트는 각 리스트가 next라는 pointer로 다음 노드를 가리키기 때문에 지울 때는 next를 수정해주면 된다.
연결이 끊어진 노드는 가비지콜렉터가 수거 해 가기 문때에 추가 처리를 하지 않아도 된다.
구현된 클래스를 테스트 해 보자.
const linkedList = new LinkedList();
linkedList.append('neo', 'CEO');
linkedList.append('eloy', 'developer');
linkedList.append('sunny', 'developer');
linkedList.append('peter', 'designer');
linkedList.print();

linkedList.insert(linkedList.indexOf('sunny'), 'hanee', 'designer');
linkedList.print();
linkedList.removeAt(3);
linkedList.print();
linkedList.remove('hanee');
linkedList.remove('eloy');
linkedList.print();

console.log(linkedList.getHead());
console.log(linkedList.size);
console.log(linkedList.isEmpty);
결과는 다음과 같다.

전체 코드는 링크에서 볼 수 있다.
해시 테이블 구현
해시 테이블은 검색속도가 빠른 데이터 구조이다.
속도가 빠른 이유은 모든 키에 대응하는 값이 있기 때문이다.
해시 테이블에서의 검색은 아래의 과정을 거쳐 이루어진다.
- 키를 받아 해시 함수를 통해 해시코드로 변환한다.
- 해시코드를 인덱스로 치환한다.
- 인덱스를 통해 값을 검색한다.
- 값이 중복될 경우, linked list 에서 값을 검색한다.
좋은 해시함수는 중복된 인덱스를 최소한으로 만들지만, 중복은 발생 할 수 밖에 없으므로, linked list 형태로 저장한다.
linked list 는 위에서 구현한 클래스를 사용한다.
해시 테이블 클래스는 이해를 위해 테이블의 길이를 제한하여 생성한다.
클래스는 table이라는 배열을 private 변수로 가지고 있다.
구현할 클래스의 메소드는 다음과 같다.
- gatHashCode(value)
- input을 임의 고정된 값으로 매핑하여 반환한다.
- getIndex(hashCode)
- 해시값을 통해 인덱스를 반환한다.
- 고정된 테이블 길이이기 때문에 고정 된 값 안에서 산출된다.
- getHashIndex(key)
- has(key)
- key를 통해 해당 값이 해시테이블 내에 존재하는지 검사한다.
- linked list의 getByKey 메소드를 사용한다.
- get(key)
- set(key, value)
- 해시테이블에 새로운 데이터를 추가한다.
- 만약 인덱스에 해당하는 연결리스트 값이 이미 존재한다면 연결리스트의 맨 뒤에 새로운 데이터를 추가한다.
- delete(key)
- key에 해당하는 값을 해시테이블에서 제거한다.
- linked list의 remove 메소드를 이용한다.
- clear()
const TABLE_SIZE = 3;

class HashTable {
  #table = new Array(TABLE_SIZE);

  getIndex(hashCode) {
    return hashCode % TABLE_SIZE;
  }

  getHashCode(value) {
    let hash = 5381;
    for (let i = 0; i< value.length; i++) {
      hash = hash * 33 + value.charCodeAt(i);
    }

    return hash % 1013;
  }

  getHashIndex(key) {
    const hashCode = this.getHashCode(key);
    return this.getIndex(hashCode);
  }

  has(key) {
    const hashIndex = this.getHashIndex(key);
    const linkedList = this.#table[hashIndex];
    return linkedList && !!linkedList.getByKey(key);
  }

  set(key, value) {
    const hashIndex = this.getHashIndex(key);
    if (!this.#table[hashIndex]) {
      const linkedList = new LinkedList();
      linkedList.append(key, value);
      this.#table[hashIndex] = linkedList;
      return linkedList;
    }

    const linkedList = this.#table[hashIndex];
    linkedList.append(key, value);
    return linkedList;
  }

  get(key) {
    const hashIndex = this.getHashIndex(key);
    const linkedList = this.#table[hashIndex];
    if (linkedList) {
      return linkedList.getByKey(key);
    }
    return linkedList;
  }

  delete(key) {
    const hashIndex = this.getHashIndex(key);
    const linkedList =  this.#table[hashIndex];
    if (linkedList) {
      linkedList.remove(key);
    }
  }

  clear() {
    this.#table = new Array(TABLE_SIZE);
  }

  print() {
    this.#table.forEach((linkedList, index) => {
      console.log('index', index);
      if (linkedList) {
        linkedList.print();
      }
    });
  }
}
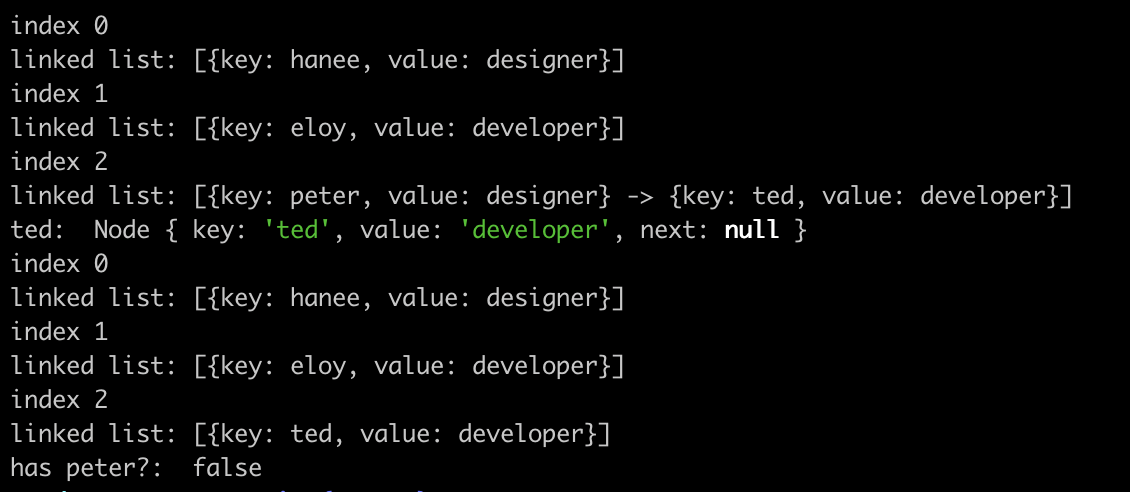
구현한 해시테이블을 테스트 해 보자
const hashTable = new HashTable();
hashTable.set('eloy', 'developer');
hashTable.set('hanee', 'designer');
hashTable.set('peter', 'designer');
hashTable.set('ted', 'developer');
hashTable.print();

console.log('ted: ', hashTable.get('ted'));
hashTable.delete('peter');
hashTable.print();

console.log('has peter?: ', hashTable.has('peter'));
결과는 다음과 같다.
전체 코드는 링크에서 볼 수 있다.
end
해시테이블 구현을 통해 해시 자료구조와, 연결 리스트 자료 구조에 대해 알아보았다.